

For decades, bed manufacturers in America used a standard hook bracket that was inserted into the end on a bed’s rails. They were held in place by 2 metal dowels. See below: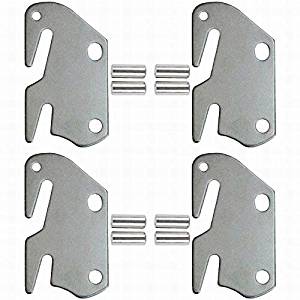
Over time, these get loose and wiggle. The metal dowels wallow out the holes drilled into the inside face of the rails. Eventually, they twist to the point that they come out of the pocket they are supposed to rest in and the bracket pulls out. Remounting the bracket in the same way it was originally placed will not really be an option for a couple of reasons:
- The rail itself probably cracked along the grain (or ply) where the slot was cut into the end (where the bracket was mounted.)
- The holes drilled for the metal dowels that secure the brackets have become wallowed out and will not hold the dowels securely any longer.


Most manufacturers of these beds will not be able to supply you with a replacement rail. If they could, it most likely would not match in color. You can find metal hook on rails from companies like Leggett & Platt, but this looks cheap and may not fit tightly since they are a universal fit. Some shops will make a customer a set of rails for a cost of $159 to $235 per rail depending on size and type of wood according to The Washington Post article here.
Your best option is to have the rail, or rails, repaired so that they can be as good as new, or better – this will save time, money and guarantee a finish match.
Hiring a professional furniture repair company to install hook brackets on-site can be a little expensive, but worth it in most cases if you cannot perform the repair. Fortunately, the repair is really a Do-It-Yourself project. It only requires a set of offset hook brackets, 3/4″ wood screws, a Phillips screwdriver, and in some cases a chisel to remove a tiny bit of wood.
***IMPORTANT*** MAKE SURE YOU ARE USING “OFFSET” BRACKETS. The offset will place your hooks right in the center of the end of the rail where the original bracket was located. Offset brackets are only available at Square 23, while other flat ones are commonly found online. If a flat plate is used, it will cause each rail to sit 3/8″ wider to the outside than originally designed. While it will still allow the bed to be used again, this could cause a setup issue with your slats, as wells as the gap between your box spring and rails will be wider. Not just a potential cosmetic issue, but a structural one as well. It’s important for the bed slats to rest fully on the rail support cleat. If the bed slats become a little too short due to moving the rails out 3/4″, your foundation and mattress could fall through to the floor.
SIMPLE ASSEMBLY AND REPAIR EXPLAINED
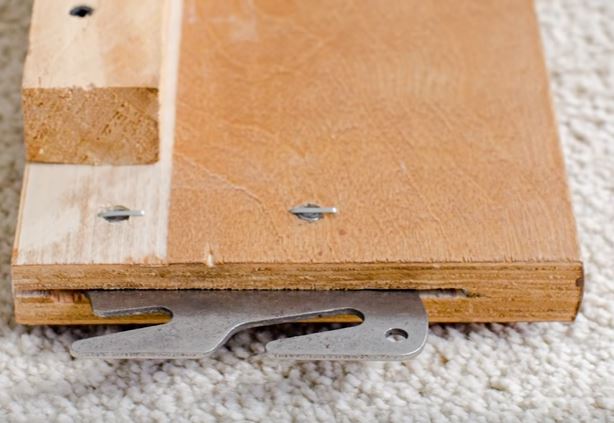
When looking at a rail, lay it down “left to right” with the inside facing up. The brackets have a “Left” and a “Right” side in order to allow the hooks on either end to face down and grip the metal pins inside the slot on the headboard and footboard of the bed. They are not interchangeable from end to end.
If there is a substantial crack on the top of the rail, add wood glue into the crack by carefully prying it apart just a bit with a flat screwdriver. This is not mandatory, but will help stabilize the integrity of the rail. Afterward, place the hook plate at the appropriate end as a dry fit. There may be instances where the slat support cleat will need to be trimmed to make room for the plate. This can usually be accomplished with a hand saw. You will need about 3 inches of space between the end of the rail and the cleat.
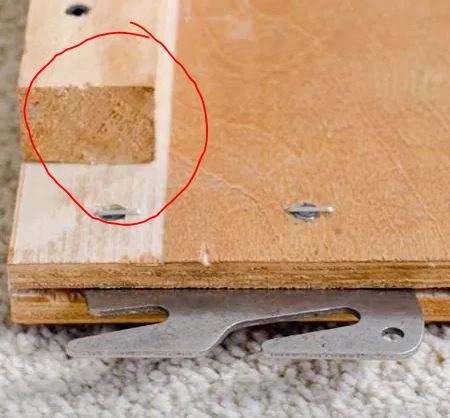
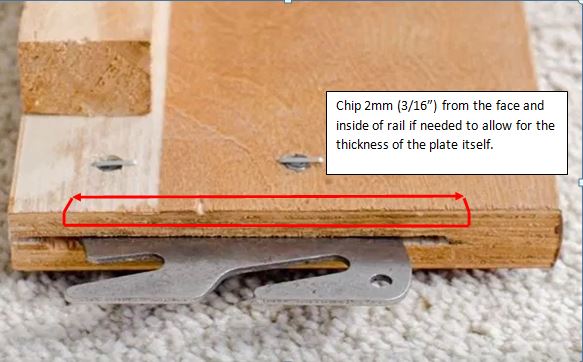
After placing the plate on the end of the rail correctly, I recommend tracing it’s location with a pencil before mounting. Make sure the hooks are in exactly the same position on each end so the rail will be level once mounted. I also recommend to take a chisel and chip out the wood on the very end of the rail about 2 mm so the hook can set back enough to allow the face of the rail to meet flush with the face of the headboard or footboard.
Use 3/4″ to 1″ max countersink head wood screws in the holes (5 per plate) to secure the bracket. The screws will be long enough to pull any crack together by acting as a clamp. They are short enough to not go all the way through the rail and stick out the finished side. I also recommend to add a heavy duty adhesive to bond the plate to the rail. Liquid nails is a safe bet. It’s available at Wal Mart or Home Depot.

These brackets will be more secure than the originals and last for a lifetime with normal usage. They will also be a seamless fit that will not cause a cosmetic, or setup issue with your bed. The entire process will take an hour or less- and save a perfectly good bed.
WHERE TO GET OFFSET BRACKETS
If you need a set of offset brackets, please click here.
Many people have commented that they cannot find the offset brackets anywhere other than this website. We offer them on Amazon for $29.99 with free shipping in the US.